In the ever-evolving world of beauty, few trends capture the imagination quite like floating crease eyeliner. This innovative technique has taken social media by storm, offering a fresh twist on traditional eye makeup that emphasizes creativity and boldness. Unlike classic winged liner that hugs the lash line, floating crease eyeliner involves drawing a line above the natural fold of your eyelid, creating an illusion of depth and dimension that “floats” independently. It’s a look that’s both artistic and versatile, perfect for anyone looking to elevate their makeup game from everyday subtle to runway-ready dramatic.
Whether you’re a makeup novice experimenting with new styles or a seasoned pro seeking inspiration, floating crease eyeliner provides endless possibilities. Originating from K-beauty influences and popularized through platforms like TikTok and Instagram, this trend blends precision with playfulness. In this comprehensive guide, we’ll dive deep into everything you need to know about floating crease eyeliner, from its origins to step-by-step application tips, ensuring you can achieve salon-worthy results at home.
The Origins and Rise of Floating Crease Eyeliner
Floating crease eyeliner didn’t emerge overnight; its roots trace back to the graphic liner movements of the 1960s, where icons like Twiggy experimented with bold, unconventional eye designs. However, it truly gained momentum in the 2010s through Korean beauty trends, where the emphasis on youthful, doll-like eyes led to innovative techniques that defy gravity. The “floating” aspect refers to the liner’s placement—disconnected from the lash line and positioned in the crease or slightly above, giving the eyes a lifted, wide-awake appearance.
Today, floating crease eyeliner is a staple in modern makeup artistry. Influencers and celebrities have propelled it into the mainstream, with stars like Zendaya and Ariana Grande incorporating variations into their red-carpet looks. On social media, hashtags related to floating crease eyeliner tutorials rack up millions of views, showcasing how this style adapts to diverse skin tones, eye shapes, and personal aesthetics. It’s not just about aesthetics; it’s a form of self-expression that challenges traditional beauty norms, encouraging experimentation with colors, shapes, and textures.
What makes floating crease eyeliner so appealing? For one, it’s inclusive. Unlike some eyeliner styles that require perfect symmetry, this trend thrives on asymmetry and creativity, making it accessible for beginners. Plus, in an era where semantic SEO practices highlight related concepts like “graphic eyeliner trends” and “cut crease variations,” content around floating crease eyeliner naturally connects with broader beauty searches, helping enthusiasts discover new ways to enhance their routines.
Essential Tools and Products for Floating Crease Eyeliner
Before diving into application, let’s talk tools. Achieving flawless floating crease eyeliner starts with the right arsenal. Here’s what you’ll need:
- Eyeliner Pencil or Gel: Opt for a creamy, smudge-proof formula like the Urban Decay 24/7 Glide-On Eye Pencil. Pencils are great for beginners due to their forgiving nature.
- Liquid Eyeliner: For sharp, precise lines, nothing beats a felt-tip pen like the Stila Stay All Day Waterproof Liquid Eye Liner. It’s ideal for creating that crisp floating effect.
- Angled Brush: If using gel liner from a pot (e.g., Maybelline Eyestudio Lasting Drama Gel Eyeliner), a fine-angled brush ensures control and detail.
- Eyeshadow Primer: Products like Too Faced Shadow Insurance prevent creasing and help the liner stay put all day.
- Cotton Swabs and Makeup Remover: Mistakes happen—have these on hand for quick fixes.
- Optional Extras: Colored liners for fun twists, or glitter toppers to amp up the drama.
Investing in high-quality, long-wear products is key, especially if you have oily lids, as floating crease eyeliner demands staying power to maintain its ethereal look throughout the day.
Step-by-Step Tutorial: How to Apply Floating Crease Eyeliner
Ready to try floating crease eyeliner yourself? Follow this beginner-friendly tutorial for a classic black line, then experiment from there.
- Prep Your Lids: Start with clean, dry eyelids. Apply an eyeshadow primer to create a smooth canvas. If desired, add a neutral base shadow to even out skin tone.
- Map Out the Crease: Look straight ahead in a mirror and identify your natural crease—the fold where your eyelid meets the brow bone. For floating crease eyeliner, you’ll draw slightly above this line for that lifted illusion.
- Draw the Line: Using your chosen liner, start from the outer corner and gently sketch a thin line parallel to your crease, extending inward toward the inner corner. Keep it disconnected from your lash line—aim for about 2-3mm of space for the “float.”
- Refine and Wing It: Thicken the line as needed for drama. Add a subtle wing at the outer edge by flicking upward, blending seamlessly into the floating crease.
- Blend or Sharpen: For a soft, smoky effect, smudge with a brush. For graphic precision, keep edges crisp.
- Balance the Look: Apply mascara and perhaps a touch of highlighter on the inner corners to make your eyes pop.
This process takes about 10-15 minutes once you’re practiced. Pro tip: Practice on the back of your hand first to get the pressure right.
Variations and Styles of Floating Crease Eyeliner
One of the beauties of floating crease eyeliner is its adaptability. Here are some popular variations to inspire your next makeup session:
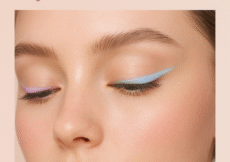
- Colored Floating Crease: Swap black for vibrant hues like electric blue or neon pink. This adds a playful pop, perfect for festivals or summer outings.
- Double Floating Lines: Draw two parallel lines above the crease for a layered effect, reminiscent of Euphoria-inspired makeup.
- Glitter-Infused: Top your floating crease eyeliner with loose glitter or metallic shadow for a sparkling, evening-ready vibe.
- Minimalist Version: A thin, subtle line in brown or gray for everyday wear, enhancing natural eye shape without overwhelming.
- Graphic Shapes: Incorporate dots, stars, or geometric patterns around the floating line for an avant-garde twist.
These styles align with semantic SEO by tying into searches for “creative eyeliner ideas” or “bold eye makeup trends,” broadening the article’s reach while providing value.
Adapting Floating Crease Eyeliner for Different Eye Shapes
Not all eyes are created equal, and floating crease eyeliner can be tailored accordingly:
- Hooded Eyes: Place the line higher above the crease to ensure visibility when eyes are open. This creates an instant lift.
- Almond Eyes: Emphasize the outer corners with extended wings for elongation.
- Round Eyes: Keep lines shorter and curved to add definition without rounding further.
- Monolid Eyes: Floating crease eyeliner shines here, as it creates the illusion of a crease. Use waterproof formulas to combat smudging.
- Deep-Set Eyes: Opt for lighter colors to bring the eyes forward, avoiding heavy blacks that can recede them.
Customization ensures everyone can rock this trend, promoting inclusivity in beauty.
Common Mistakes and How to Avoid Them
Even pros slip up with floating crease eyeliner. Avoid these pitfalls:
- Uneven Lines: Solution: Use a mirror at eye level and draw with eyes open to check symmetry.
- Smudging: Primer is your best friend; set with translucent powder if needed.
- Overloading Product: Start light and build up—it’s easier to add than remove.
- Ignoring Skin Type: Oily lids? Go matte. Dry? Creamy formulas work best.
By troubleshooting these, you’ll master floating crease eyeliner in no time.
Celebrities and Influencers Embracing Floating Crease Eyeliner
From red carpets to Reels, floating crease eyeliner is everywhere. Zendaya’s Met Gala looks often feature subtle floating lines, while K-pop idols like Blackpink’s Lisa use bold versions for stage presence. Influencers like NikkieTutorials break down tutorials, making it approachable. This celebrity endorsement fuels the trend’s popularity, linking to broader discussions on “celebrity makeup hacks.”
FAQs About Floating Crease Eyeliner
What is floating crease eyeliner?
Floating crease eyeliner is a makeup technique where liner is applied above the natural eyelid crease, creating a disconnected, floating effect that adds dimension and creativity to eye looks.
Is floating crease eyeliner suitable for beginners?
Absolutely! Start with a pencil liner for easier control, and practice simple lines before advancing to complex designs.
How long does floating crease eyeliner last?
With a good primer and waterproof formula, it can last 8-12 hours. Touch-ups may be needed for oily skin.
Can I wear floating crease eyeliner with glasses?
Yes, it enhances eye visibility under frames. Opt for bolder lines to ensure they stand out.
What’s the difference between floating crease eyeliner and cut crease?
Cut crease involves shadowing to define the crease, while floating crease eyeliner uses liner alone for a graphic, floating appearance.
Are there any skin concerns with floating crease eyeliner?
Use hypoallergenic products to avoid irritation. Remove gently at night to prevent buildup.
How can I remove floating crease eyeliner easily?
Oil-based removers like micellar water work best. Gently swipe without rubbing to protect delicate eye skin.
Final Thoughts on Floating Crease Eyeliner
Floating crease eyeliner isn’t just a trend—it’s a gateway to unleashing your inner artist. By incorporating this style into your routine, you tap into a world of endless creativity, boosting confidence with every stroke. Whether you’re aiming for subtle elegance or bold statements, remember: practice makes perfect. Experiment, have fun, and let your eyes tell a story. For more beauty insights, explore related trends like graphic eyeliner or eyeshadow techniques. Ready to float your way to fabulous? Grab your liner and get started today!

