Whether you are logging into a Zoom meeting, filming a TikTok, or preparing for a professional photoshoot, the camera lens captures your face differently than the human eye. Cameras tend to “wash out” features, making definition disappear and colors look muted. Because eye contact is the primary way we connect digitally, your eyes become the focal point of the screen.
Looking polished on camera doesn’t require a professional makeup artist or hours in front of the mirror. It simply requires understanding how lenses and lighting interact with your makeup. By mastering a few fundamental techniques, you can ensure your eyes look bright, defined, and awake, regardless of pixel quality or lighting conditions.
Essential Tools for Your Kit

Before applying any product, you need the right tools. A camera-ready look relies on products that offer longevity and definition without looking heavy or cakey.
An Eyeshadow Primer
This is non-negotiable for on-camera looks. Studio lights and nervous energy can lead to oiliness on the lids, which causes creasing. A good primer neutralizes discoloration (veins or redness) and gives your shadow something to grip, ensuring the color stays true and vibrant through the lens.
Neutral Eyeshadow Palette
You don’t need a rainbow of colors. For video and photography, a palette with matte neutrals—browns, taupes, creams, and soft blacks—is most effective. Matte textures absorb light, allowing you to create depth and dimension that translates well on screen.
Gel or Liquid Eyeliner
Pencils can sometimes look soft or smudge under hot lights. A gel or liquid liner provides the crisp, dark line necessary to define the lash line and make your lashes look thicker.
Volumizing Mascara
Lashes often disappear on camera. A formula that focuses on volume and separation is key to opening up the eye area.
Step-by-Step Application Guide
Once your kit is ready, follow this routine to build a look that stands out on screen.
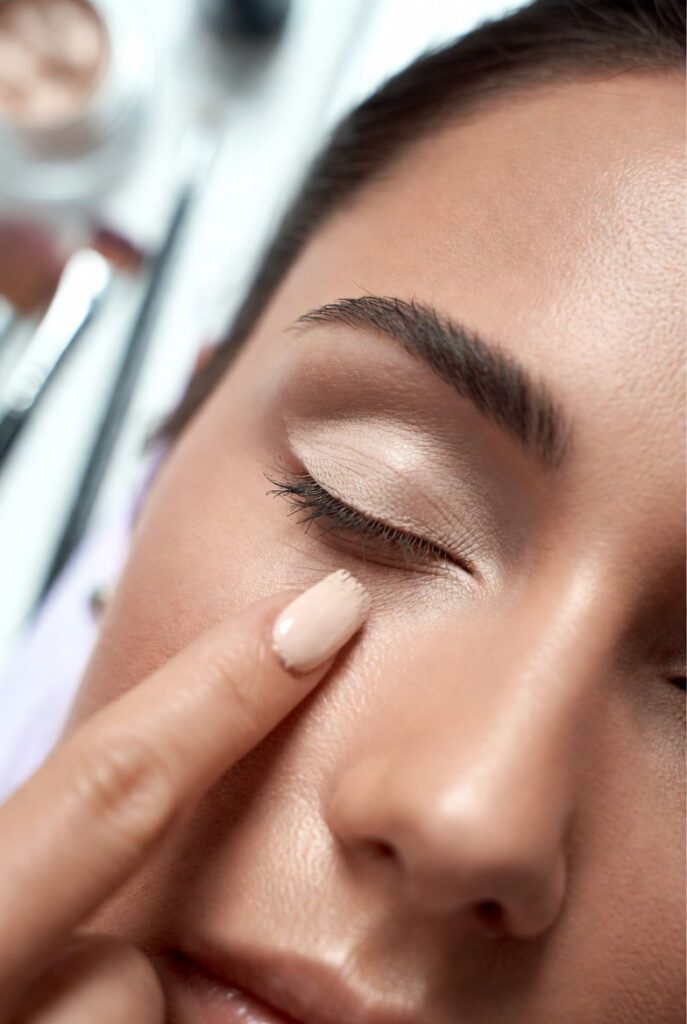
1. Prep and Prime
Start with a clean, dry eyelid. Apply a small amount of primer from the lash line up to the brow bone. If you don’t have a specific eyeshadow primer, a dab of concealer set with translucent powder works in a pinch. This step ensures a smooth canvas and prevents the camera from picking up on uneven skin texture.
2. Define the Brows
Brows frame the face and provide structure. On camera, brows can appear lighter or sparser than they are in real life. Use a brow pencil or powder one shade lighter than your hair color to fill in gaps. Focus on the tail of the brow and the arch to lift the eye. clear brow gel can help groom the hairs into place for a polished finish.
3. Build Dimension with Shadow
Since cameras flatten features, you need to artificially put the dimension back in.
- The Base: Sweep a bone or cream-colored shadow all over the lid to set the primer.
- The Crease: Take a medium-brown matte shade (or a color two shades darker than your skin tone) and blend it into the crease using windshield-wiper motions. This creates a shadow that recedes, making your eyes look larger and more structured.
- The Lid: If you want a bit of brightness, pat a lighter shade on the center of the mobile lid.
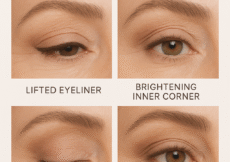
4. Tightline and Define
To make your lash line look dense without a heavy eyeliner look, try tightlining. Lift your eyelid gently and apply black or dark brown liner to the upper waterline (the area right under your lashes). Then, draw a thin line across the top lash line, getting as close to the root as possible. Avoid thick, heavy lines on the bottom lash line, as this can drag the eye down and create shadows that look like dark circles on camera.
5. Curl and Coat
Never skip the eyelash curler. Curling lifts the lashes, allowing light to hit the iris, which makes the eyes sparkle. Follow up with two coats of black mascara. Wiggle the wand at the root and pull through to the tip to maximize volume.
Lighting Considerations

Your makeup might look perfect in your bathroom mirror, but lighting changes everything.
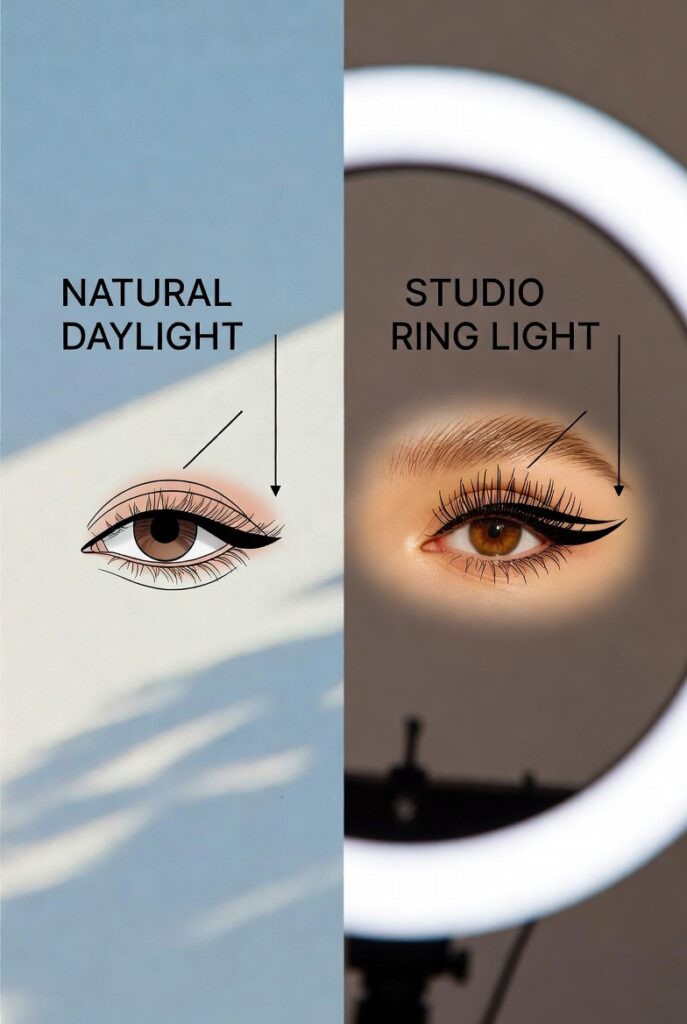
Natural Light: This is the most unforgiving light. It reveals texture, unblended edges, and color mismatches. If you are filming in front of a window, ensure your blending is seamless. Avoid heavy powders, as sunlight will highlight “cakey” texture.
Ring Lights and Artificial Light: These lights are designed to blast light onto the face to reduce shadows, but they also wash out color. If you are using a ring light, you may need to apply your blush, bronzer, and contour slightly heavier than you would for an in-person meeting. Ensure your T-zone is matte, as artificial lights reflect off oil and can create distracting “hot spots” on the face.
Common Mistakes to Avoid
Even with the best products, certain techniques can backfire on camera.
Overdoing the Shimmer
While a little shimmer on the inner corner can wake up the eyes, too much glitter or metallic shadow on the lid can reflect light unpredictably. This can create texture where there is none or cause a “strobe” effect that distracts the viewer. Stick to satin or matte finishes for the main parts of the eye.
Ignoring the Blend
High-definition cameras pick up harsh lines instantly. If your eyeshadow isn’t diffused properly, it can look patchy or amateurish on a large monitor. Always use a clean, fluffy brush to blend out the edges of your shadow until there is a seamless gradient into your skin tone.
Forgetting the Under-Eye
Dark circles are accentuated by overhead lighting and camera contrast. Use a color corrector (peach for fair skin, orange for deeper skin) to cancel out blue or purple tones before applying concealer. This brightens the center of the face and makes you look well-rested.
Frequently Asked Questions
What’s the best primer for oily eyelids?
If your lids tend to get greasy, opt for a primer specifically designed for oil control. Look for “anti-aging” or “long-wear” formulas, like the Urban Decay Primer Potion or NARS Smudge Proof Eyeshadow Base. These dry down to a matte finish and create a barrier against oil.
How do I prevent smudging on camera?
Heat from lights or nervousness can cause makeup to migrate. To prevent “raccoon eyes,” use waterproof eyeliner and mascara. Additionally, set your under-eye concealer with a finely milled loose powder to stop your mascara from transferring onto your skin.
Can I skip falsies?
Absolutely. While false lashes add drama, they aren’t necessary for a professional camera-ready look. You can achieve a similar effect by layering a volumizing mascara. If you do want extra oomph, try individual lashes on the outer corners rather than a full strip, which can sometimes look heavy and close off the eye on screen.
Practice Makes Perfect
Mastering camera-ready makeup is a skill that improves with repetition. The best way to check your work is to do a “test run.” Open your webcam or phone camera in the lighting you plan to use and see how your makeup translates on screen. You might find you need a little more blush, a little less liner, or a bit more blending.
By focusing on definition, matte textures, and proper lighting, you can log on with confidence, knowing you look your absolute best.
