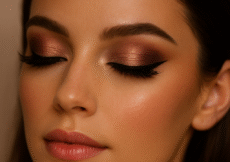
Mastering the art of eyeshadow can feel like a major beauty milestone. Among the many techniques, the gradient eyeshadow look stands out for its elegance and versatility. It involves blending multiple shades from light to dark, creating a beautiful, seamless transition of color across your eyelids. This effect adds depth, dimension, and a professional touch to your makeup.
This tutorial will guide you through every step of creating the perfect gradient eyeshadow look. We will cover everything from choosing the right colors and tools to mastering blending techniques. You’ll also learn about common mistakes to avoid and how to make your stunning creation last all day. Get ready to elevate your makeup skills and turn heads with your beautifully blended eyes.
What is a Gradient Eyeshadow Look?
A gradient eyeshadow look is a technique where two or more eyeshadow colors are blended together on the eyelid to create a smooth transition. Typically, the colors are arranged from the lightest shade in the inner corner of the eye to the darkest shade in the outer corner. This creates a “fade” or “ombre” effect that can make your eyes appear larger and more defined.
The beauty of the gradient technique lies in its adaptability. You can create a subtle, everyday look with neutral tones or go for a bold, dramatic effect with vibrant, contrasting colors. It’s a foundational skill that, once mastered, opens up a world of creative makeup possibilities.
Choosing Your Colors
The key to a successful gradient eye is a well-chosen color palette. The colors need to work together harmoniously to create a seamless blend.
Understanding Color Theory
A basic understanding of color theory can be a game-changer. Here are three simple approaches to picking your shades:
- Monochromatic: This involves using different shades and tones of a single color. For example, you could use a light pink, a medium rose, and a deep burgundy. This is the easiest approach for beginners as the colors naturally blend well together.
- Analogous: This method uses colors that are next to each other on the color wheel, like orange, yellow, and red, or blue, green, and teal. These palettes create a vibrant yet cohesive look.
- Complementary: For a bold, high-impact look, choose colors that are opposite each other on the color wheel, such as blue and orange or purple and yellow. This creates a striking contrast that is sure to get noticed. You might want to use a neutral transition shade to help these colors blend more smoothly.
Selecting Your Shades
For a classic gradient look, you’ll need at least three shades from the same color family:
- A Light Shade: This will be your highlight color. It is applied to the inner corner of your eye and often on the brow bone to brighten and open up the eye.
- A Medium Shade: This is your transition color. It will bridge the gap between your light and dark shades, helping to create a smooth blend. It’s applied to the middle of your eyelid.
- A Dark Shade: This is your contour or definition color. It’s applied to the outer corner and crease to add depth and a touch of drama.
When starting out, consider using a pre-made eyeshadow palette. These palettes are often designed with complementary colors, taking the guesswork out of your selection process.
Essential Tools for the Perfect Blend
Having the right tools is just as important as having the right eyeshadow. You don’t need dozens of brushes, but a few key types will make the application process much smoother and more professional.
- Eyeshadow Primer: This is a non-negotiable first step. A good primer creates a smooth canvas for your eyeshadow, helps colors appear more vibrant, and prevents creasing for long-lasting wear.
- Flat Shader Brush: This brush has dense, firm bristles and is used for packing color onto the eyelid. Its flat shape allows for precise application and maximum color payoff.
- Fluffy Blending Brush: This is the hero of any eyeshadow look. A fluffy, dome-shaped brush is essential for diffusing harsh lines and blending colors together seamlessly. It’s worth investing in a good quality one.
- Pencil or Detail Brush: This small, pointed brush is perfect for applying color to the inner corner of the eye or along the lower lash line with precision.
- Clean Blending Brush: Keeping an extra, clean fluffy brush on hand is a pro tip. You can use it to blend the edges of your eyeshadow without adding more product, ensuring a flawless finish.
Step-by-Step Gradient Eyeshadow Tutorial
Now that you have your colors and tools, it’s time to create the look. Follow these steps for a perfect gradient eye.
Step 1: Prime Your Eyelids
Start with a clean, dry eyelid. Apply a thin layer of eyeshadow primer from your lash line all the way up to your brow bone. Use your finger or a concealer brush to pat it in gently. Let it set for a minute before moving on. This step ensures your masterpiece stays put all day.
Step 2: Apply the Lightest Shade
Take your flat shader brush and pick up your lightest eyeshadow color. Pat this shade onto the inner third of your eyelid, starting from the inner corner and extending towards the center. Applying with a patting motion, rather than a sweeping one, will give you the most intense color payoff. You can also add a touch of this color to the very inner corner of your eye to create a bright, awake look.
Step three: Apply the Medium Shade
Clean your flat shader brush or use a different one to apply your medium transition color. Pat this shade onto the center of your eyelid, overlapping slightly with the light shade you just applied. Don’t worry about blending just yet; focus on placing the color correctly.
Step 4: Apply the Darkest Shade
Using the same brush, apply your darkest shade to the outer third of your eyelid. Create a “V” shape in the outer corner, extending the color slightly into the crease. This will add depth and definition to your eye shape. Again, focus on placing the color accurately.
Step 5: The Art of Blending
This is the most crucial step. Take your fluffy blending brush. With a light hand, use small, circular motions and back-and-forth “windshield wiper” motions to blend the lines where the colors meet.
- Start by blending the line between the medium and dark shades.
- Next, blend the line between the light and medium shades.
- Work your way into the crease, blending the dark shade upwards and inwards to soften the look.
- Be patient. Good blending takes time. The goal is to have a seamless transition where you can’t tell where one color ends and another begins.
Step 6: Define the Lower Lash Line
For a more complete and balanced look, apply the same gradient effect to your lower lash line. Use a pencil brush to apply the darkest shade to the outer third of your lower lash line, the medium shade to the middle, and the lightest shade to the inner third. Use the same brush or a clean finger to gently smudge and blend the colors together.
Step 7: Highlight and Finish
To complete the look, apply your lightest, shimmery shade to your brow bone (just under the arch of your eyebrow) and the inner corner of your eye. This final highlight makes your eyes pop. Finish with your favorite eyeliner and a few coats of mascara.
Common Mistakes to Avoid
Even seasoned makeup lovers can make mistakes. Here are a few common pitfalls to watch out for:
- Using Too Much Product: It’s always easier to add more color than to take it away. Start with a small amount of eyeshadow on your brush and build up the intensity gradually.
- Pressing Too Hard with Your Brush: Blending requires a light touch. Pressing too hard can cause the colors to become muddy and can irritate the delicate skin around your eyes.
- Not Blending Enough: This is the most common mistake. Harsh lines between colors are a dead giveaway of an amateur application. Take your time and use a clean blending brush to soften all the edges.
- Forgetting Primer: Skipping primer is a recipe for creasing and fading. This simple step makes a massive difference in the longevity and vibrancy of your eyeshadow.
Tips for a Long-Lasting Look
You’ve spent all this time creating a beautiful gradient eye; you want it to last! Here are a few extra tips:
- Set with Powder: If you have oily eyelids, try dusting a small amount of translucent setting powder over your primer before you begin applying eyeshadow.
- Use a Setting Spray: Once your entire makeup look is complete, a few spritzes of a makeup setting spray will lock everything in place for hours.
- Choose Quality Eyeshadows: While you can achieve a gradient look with any eyeshadow, higher-quality formulas tend to be more pigmented and easier to blend, leading to a better, longer-lasting result.
Creating a stunning gradient eyeshadow look is a skill that anyone can learn. It simply takes a little practice, the right tools, and an understanding of the technique. Don’t be afraid to experiment with different color combinations to find what you love.
Now it’s your turn! Grab your favorite palette and follow this tutorial to create your own beautiful gradient eye look. Share your results and let us know what color combinations you tried.

